Rava Idli is a delicious and healthy alternative to traditional idli. With its quick and easy preparation, soft and fluffy texture, along with the ability to customize flavors, rava idli is the perfect option for those craving a taste of South Indian cuisine without the hassle of fermentation. Whether you're a fan of South Indian cuisine or simply looking to try something new, my recipe for rava idli is a must-try dish that will definitely satisfy your taste buds!
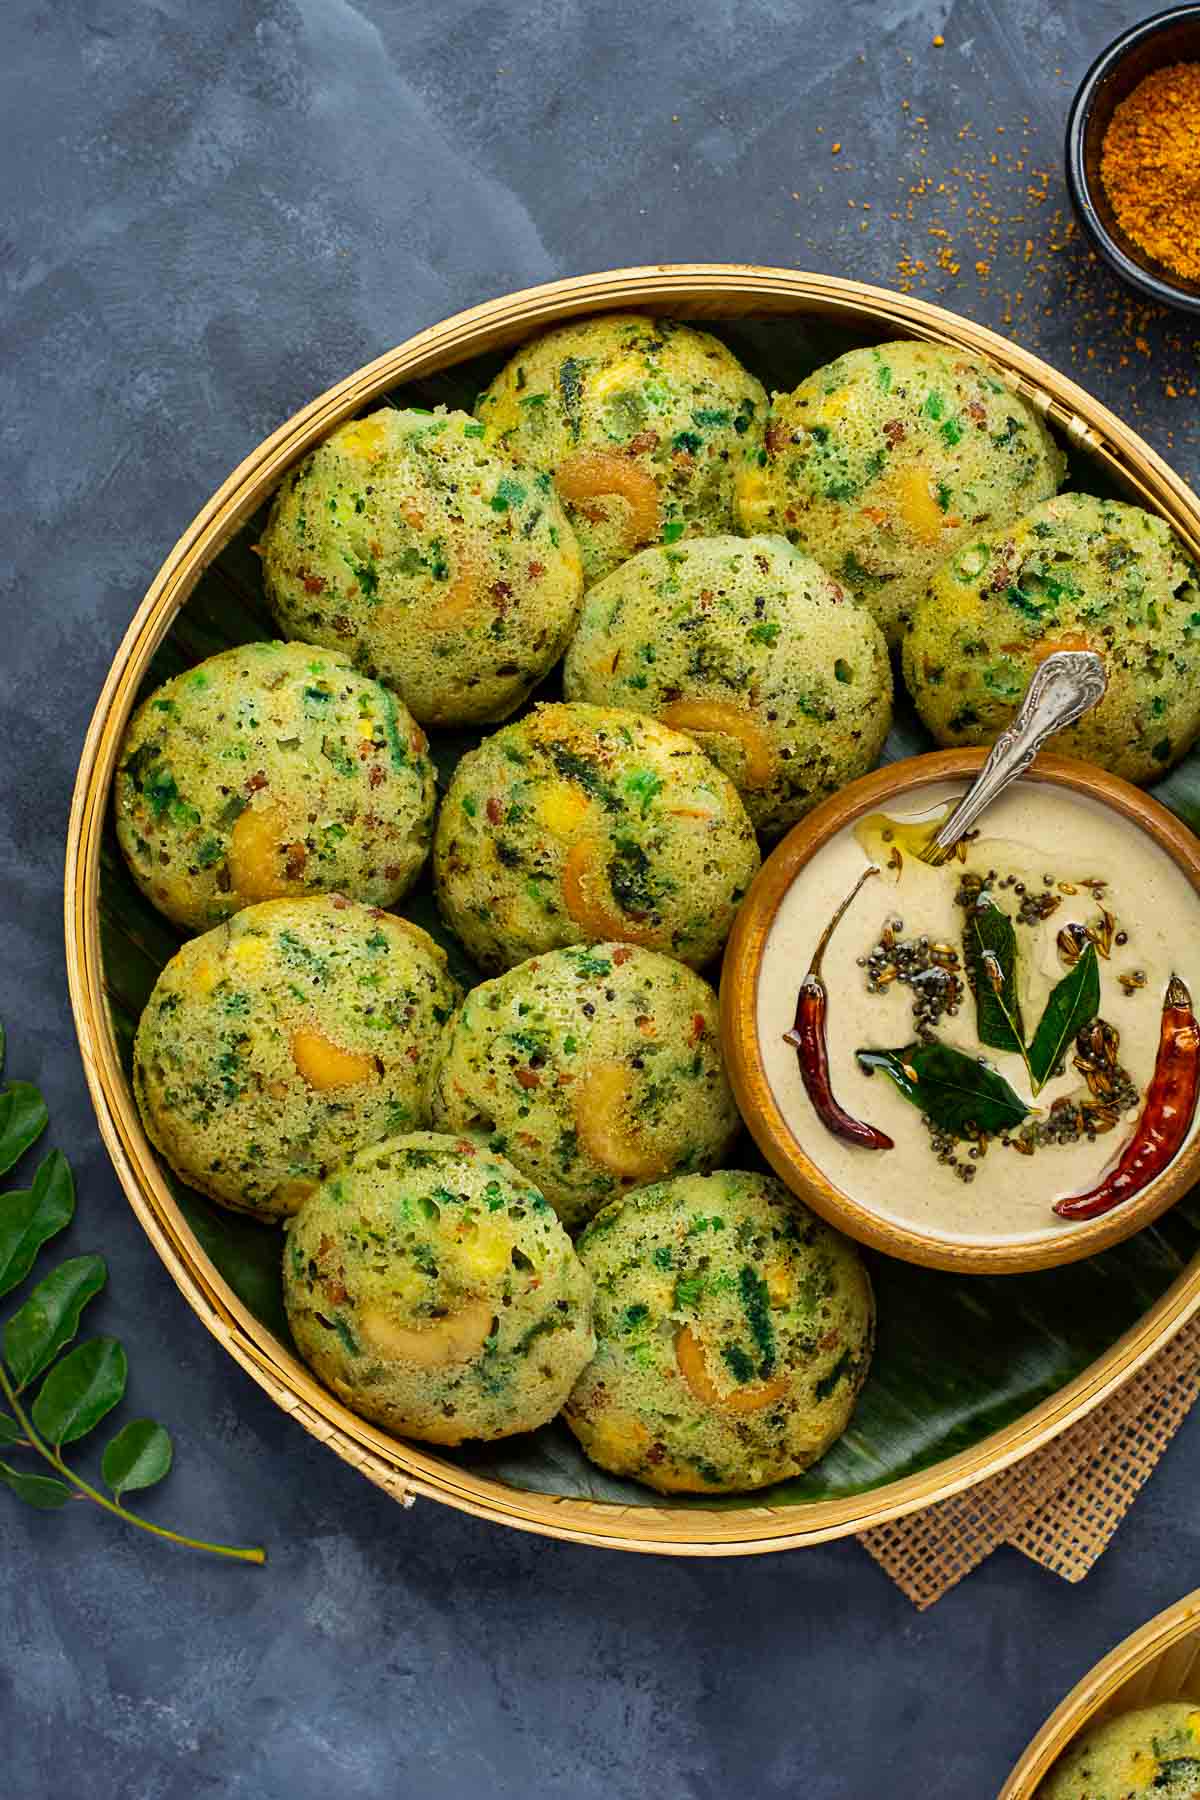
What is rava idli?
When it comes to popular South Indian delicacies, idli undoubtedly reigns supreme. These fluffy, steamed rice cakes are not only a staple breakfast option but also a favorite among people of all ages. While traditional idli is made from fermented rice and lentil batter, there is a delightful variant that has gained immense popularity in recent years – Rava Idli. Made with semolina (rava) instead of rice, rava idli offers a quick and easy way to enjoy this delectable delicacy without compromising on taste. These soft and spongy idlis offer a unique texture and a burst of flavors.
Origins of rava idli
Rava idli (also known as Sooji Idli) originated in Karnataka, a state in southern India known for its rich culinary heritage. It was invented by Mavalli Tiffin Room (MTR), a renowned restaurant in Bangalore, as a solution to the problem of making idlis instantly. The traditional idli batter requires fermentation, which takes time. Rava idli was introduced as a quick and hassle-free alternative that would still satisfy the idli cravings of people who didn't have the luxury of time. Today, rava idli has become immensely popular not only in Karnataka but also across the entire South Indian region and beyond.
Jump to:
Ingredients
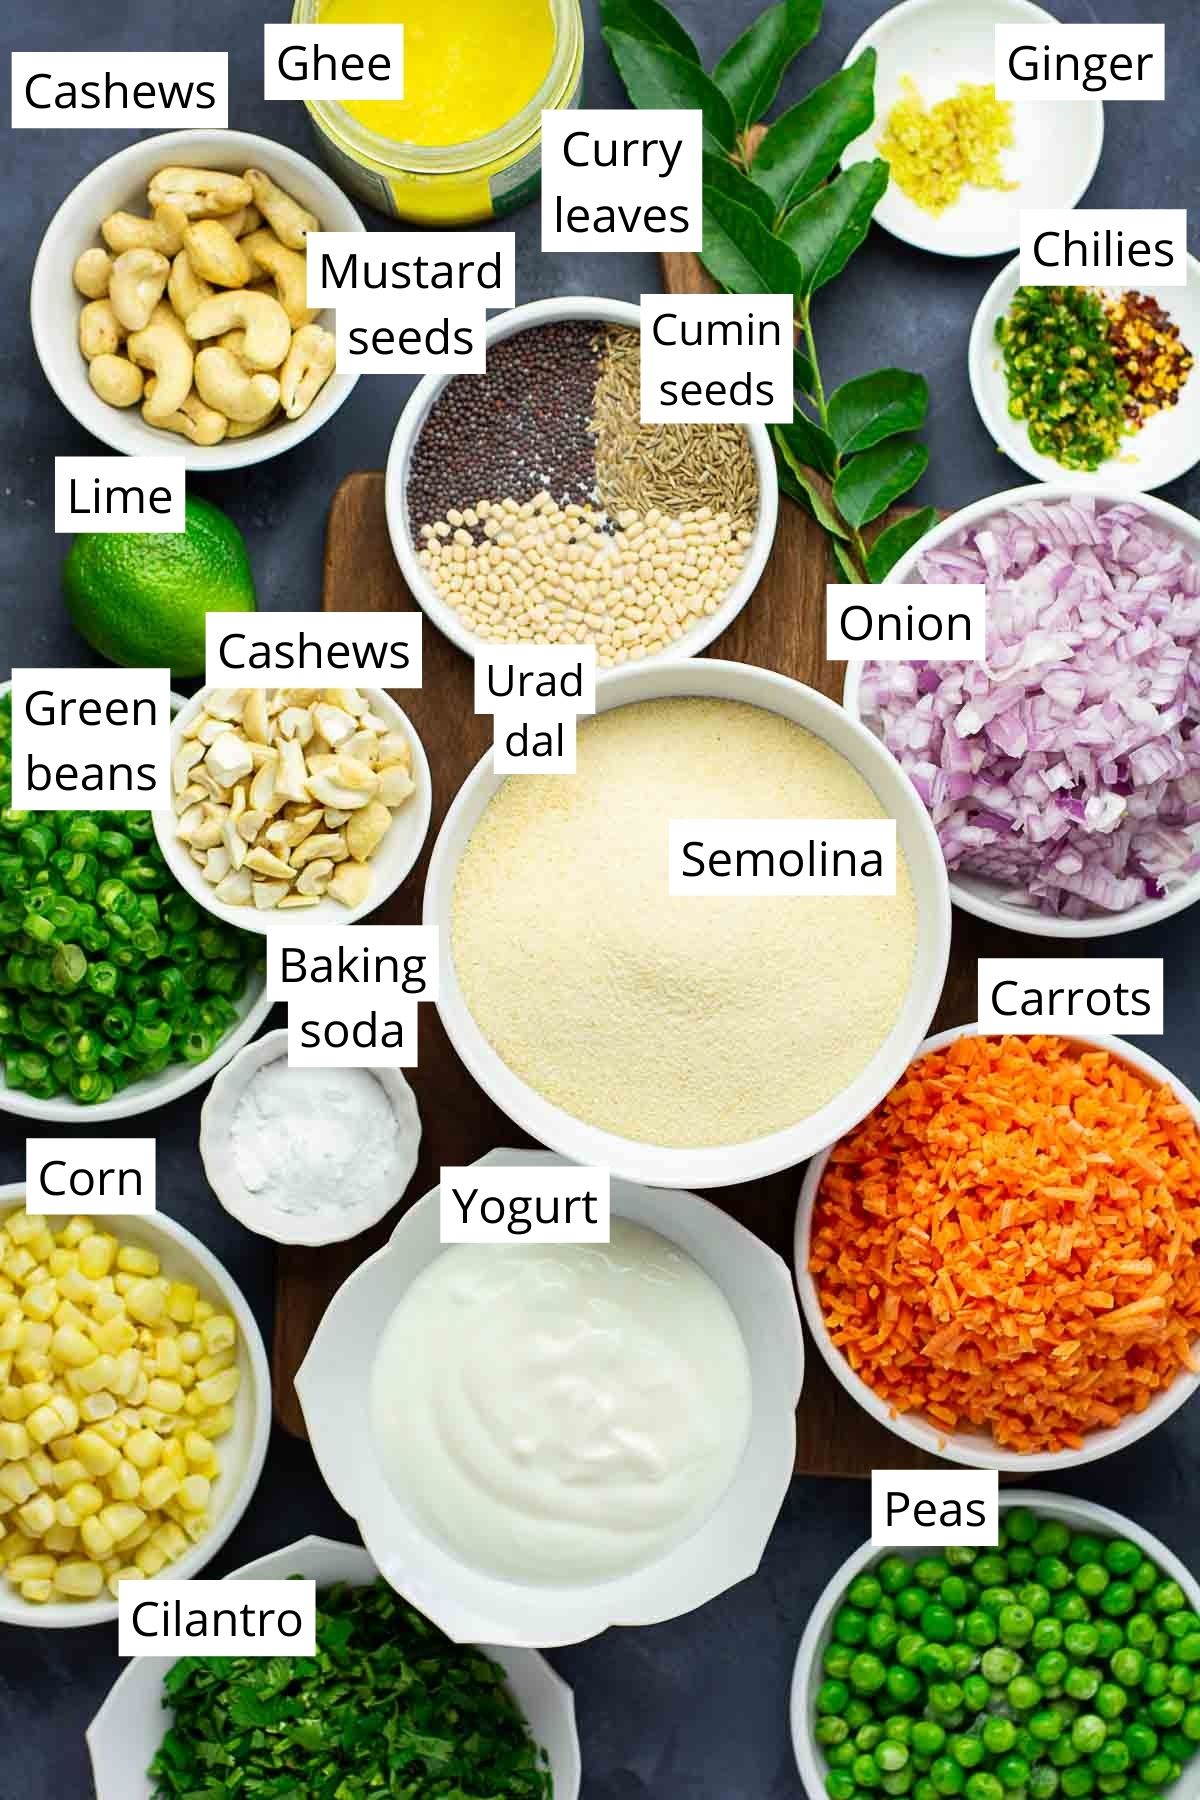
- Ghee lends an amazing flavor to these idlis. I like using grassfed organic ghee.
- Tempering spices - mustard seeds, cumin seeds, urad dal, curry leaves
- Cashews add a lovely crunch to these and make them look beautiful.
- Ginger, spicy green chilies (Thai green peppers) and red pepper flakes for flavor and heat.
- Vegetables - I like using red onion, carrots, green beans, green peas and corn. Feel free to use your favorite veggies in this recipe.
- Semolina/rava is the main ingredient for these idlis. I like using fine semolina for tender, soft idlis
- Yogurt adds sourness and helps in making the idlis fluffy.
- Cilantro leaves and lime juice - for freshness
- Baking soda reacts with the yogurt and helps make these idlis fluffy and airy. You can replace it with ENO in this recipe
How to make rava idli

- Heat the ghee in a large frying pan on medium heat.
- When it is hot, add in the whole cashews and fry them for about a minute or until they turn golden brown in color. Drain them with a slotted spoon and reserve them in a bowl for later.
- Add in the mustard seeds and let them pop. After they pop, add in the cumin seeds, curry leaves, urad dal and chopped cashews. Fry this mixture for about 2 minutes or until the cashews and urad dal have browned nicely.
- Now add in the ginger, green chilies and red pepper flakes and stir fry for about a minute before adding in the finely chopped onion/green onion. Cook this mixture for about 3-4 minutes or until the onions have turned translucent.

5. Add in the rava(semolina) and roast this mixture on medium heat for about 5 minutes or until the semolina is lightly browned. Turn off the heat and let this mixture cool for about 10 minutes before proceeding.
6. Add the cooled mixture into a large bowl. Add in the yogurt and the water.
7. Mix everything together. Let this mixture sit for about 10 minutes.
8. After 10 minutes, add in the grated carrots, chopped beans, peas, corn, cilantro leaves and salt.
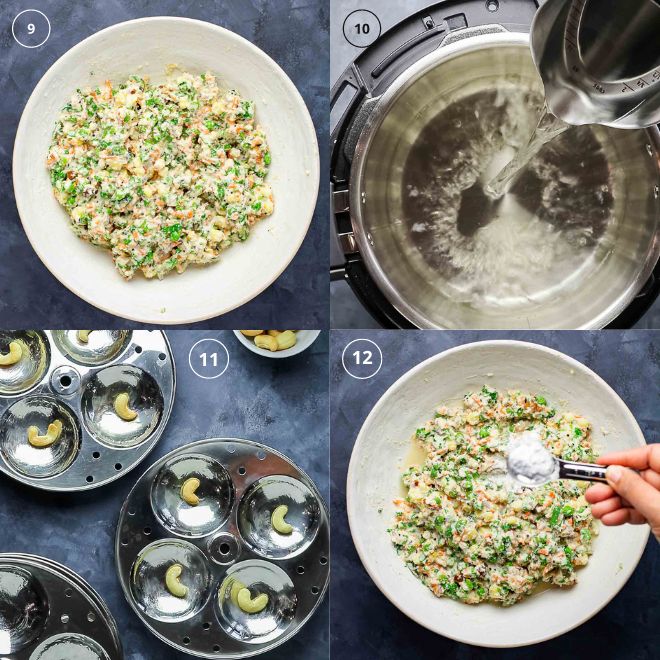
9. Mix well to combine.
10. In the meanwhile, preheat your stove top/microwave idli steamer with water and have it steaming and ready for the next step.
11. Grease the idli molds with ghee and place a roasted cashew that you roasted earlier, in the middle of each mold.
12. Now, add in the lime juice and baking soda/ENO into the batter and mix well to combine.
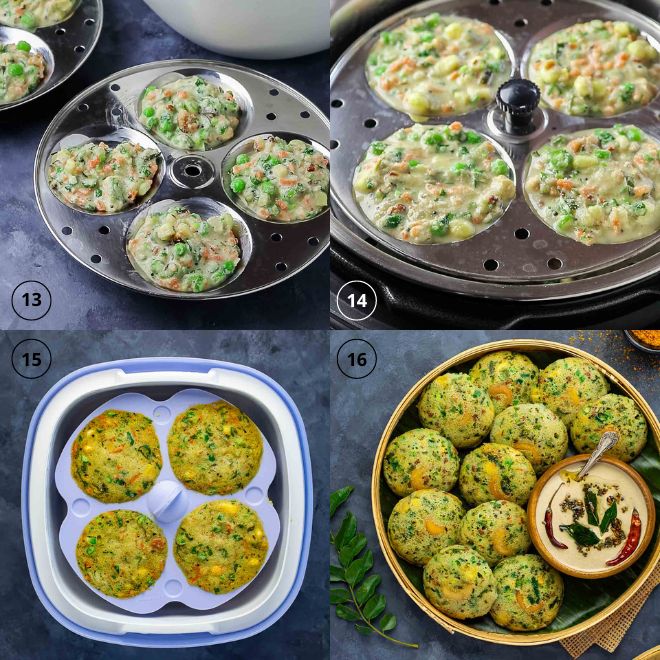
13. Pour a little less than ¼ cup of batter into each mold.
14. Place into the hot steamer. Steam this mixture on high for 12 minutes if using a stove top steamer/instant pot or 5 minutes if using a microwave steamer.
15. After the idlis have been steamed, carefully take out the idli stand and let it cool for a few minutes.
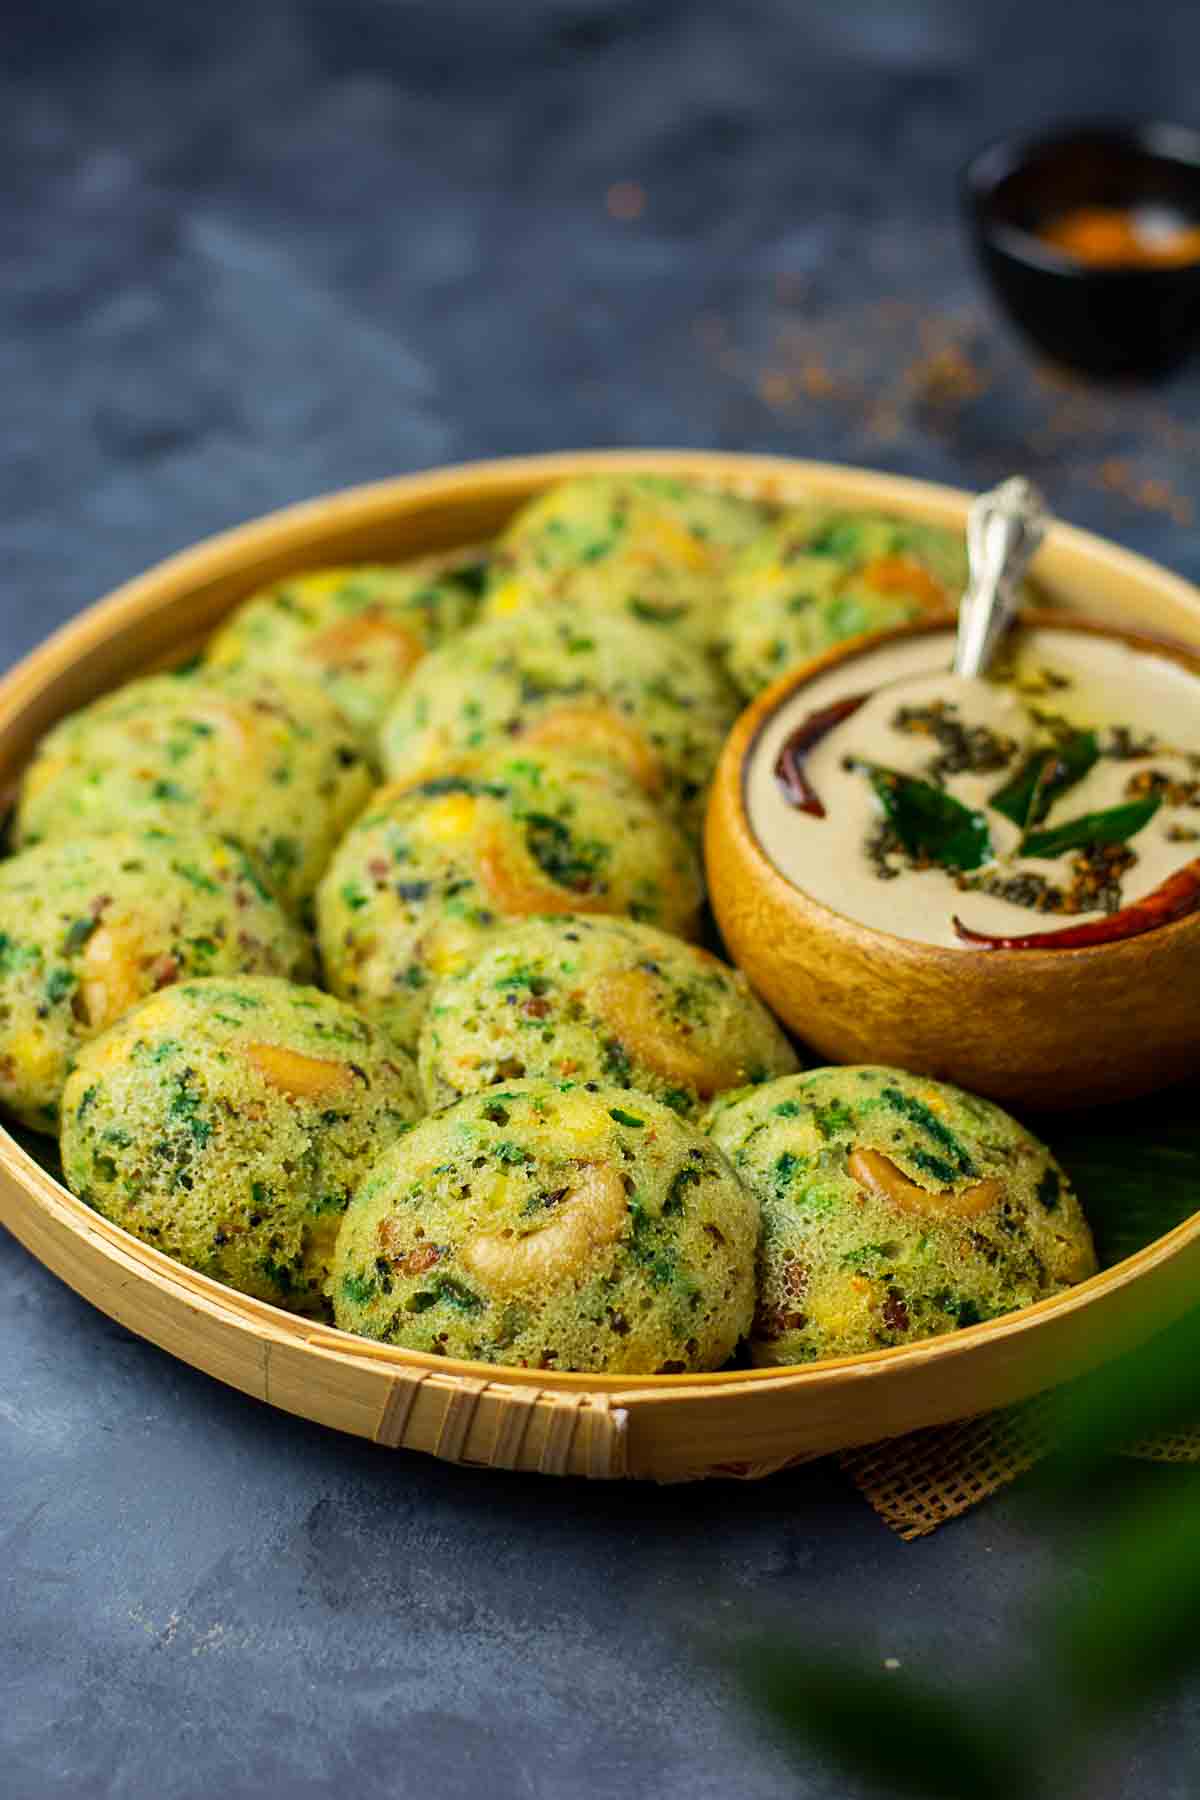
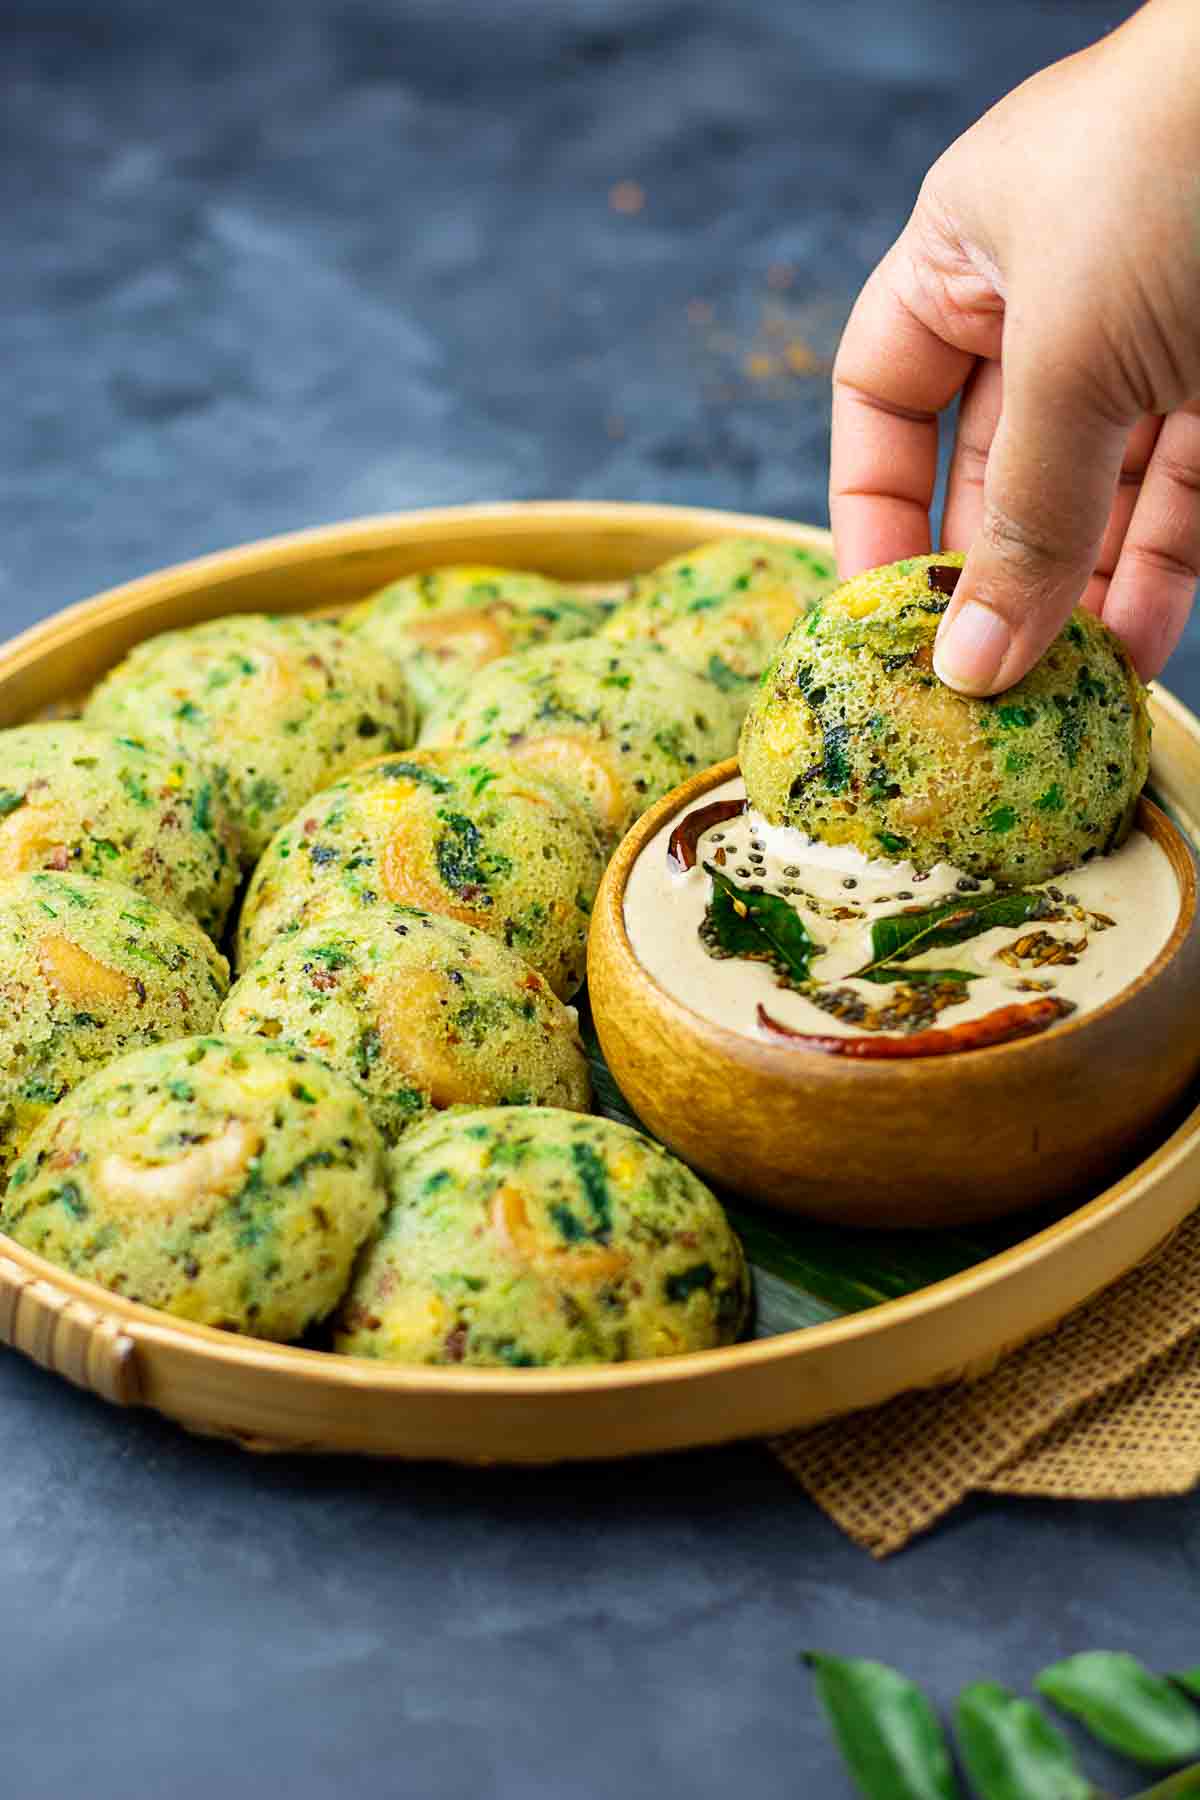
16. Use a spoon to scoop them out of the molds and invert them onto a platter to unveil the beautiful domed shape and the cashew in the middle. Serve with peanut chutney.
Tips and tricks
- Roast the semolina (rava) properly: Roasting the semolina on low heat until it turns light golden brown enhances the flavor and texture of the idlis. Make sure to stir continuously while roasting to prevent burning.
- Yogurt consistency: Use thick and sour yogurt (curd) for the idli batter. The sourness adds a tangy flavor to the idlis. I like adding a few drops of lime juice to the batter for added flavor and to make the idlis fluffy.
- Resting time: Allow the batter to rest for at least 10 minutes after mixing the semolina and yogurt. This resting time helps the semolina absorb the yogurt, resulting in softer idlis.
- Adjust the consistency: The batter should have a thick but pourable consistency, similar to pancake batter. If the batter is too thick, the idlis may turn out dense. Add a little water or yogurt to adjust the consistency if needed.
- Use baking soda sparingly: Baking soda is added to make the idlis fluffy. However, using too much baking soda can make the idlis taste bitter. I use around 1 teaspoon for 1 cup of semolina.
- Grease the idli molds: Grease the idli molds with oil or ghee before pouring the batter. This prevents sticking and makes it easier to remove the idlis once they are cooked.
- Steam the idlis properly: Steam the idlis on medium heat for the time mentioned below to ensure even cooking. Avoid opening the steamer lid frequently as it can result in unevenly cooked idlis.
- Customize with vegetables: I like adding finely chopped/grated vegetables to the batter for added nutrition and flavor. Use your favorite veggies in this recipe (see notes in the recipe card below).
- Garnish with tempering: For an extra burst of flavor, prepare a tempering by heating oil, adding mustard seeds, cumin seeds, curry leaves, and cilantro, and pouring it over the steamed idlis before serving.
- Serve hot: Rava idlis taste best when served hot. Enjoy them with peanut chutney or sambar for a complete South Indian experience.
Substitutions
If you'd like to make it vegan:
- Yogurt - Replace yogurt with any unflavored vegan yogurt of your choice.
- Ghee - replace ghee with coconut oil or any other oil of your choice, to keep it completely vegan yet super flavorful!
Check out this tamarind tofu ghee roast recipe, if you like South Indian flavors!

Variations
Here are some variations you can make to change up this recipe:
- Spicy - This recipe is at a medium spice level. Add more or less spicy green chilies and red pepper flakes, depending on how spicy you like it!
- Deluxe - add in some grated or shredded fresh coconut, seeds or your favorite nuts to the batter to make it even more nutrient dense and delicious.
- Kid friendly - The original recipe below is not too spicy. If your kids can't tolerate any spice, omit the chilies altogether.
Pairing
Serving rava idlis with coconut chutney, tomato chutney, or sambar can take the flavors to a whole new level.
My favorite pairing with rava idli is peanut chutney! Definitely try out my chutney recipe, you will love the combination.
Equipment
Here are the essential items you'll need to make rava idli:
- Mixing Bowl: A medium-sized mixing bowl will be used to prepare and mix the idli batter. Make sure it is big enough to accommodate all the ingredients comfortably.
- Pan or Skillet: A pan or skillet will be used to make the tadka and roast the rava (semolina) before adding it to the batter. It should be wide enough to allow even roasting of the rava.
- Steamer: A steamer is necessary for steaming the idlis. You can use a traditional idli steamer, which consists of a large pot with stacked idli plates, an instant pot or a microwave steamer. Ensure that the steamer has a lid to retain the steam.
- Idli Molds: If you're using a traditional idli steamer or an instant pot, you'll need idli molds. These are small, round, and perforated plates or trays with cavities to hold the idli batter. Grease the molds lightly with oil or ghee before pouring the batter.
- Silicone Idli liners: if you're worried about cleanup and sticking, then you've got to try these silicone idli liners. Just pop each one in your idli mold and steam the idlis as usual. Wait for the idlis to cool a bit before popping them out. No sticking and the idlis turn out beautifully!
Storage
Rava idli stores well in air tight glass containers in the refrigerator for 4-5 days. When ready to eat, microwave them for in 30 second increments until heated through.
I love to make a large batch of these rava idlis and refrigerate them for a week. They are so easy to heat and enjoy on busy mornings.
Frequently asked questions
Is rava idli gluten-free?
Rava idli is not gluten-free since it is typically made with semolina, which is derived from wheat. However, you can explore alternative flours like rice flour, oats, or millet flour to make gluten-free versions of idlis.
How can I make rava idlis softer and fluffier?
To make softer and fluffier rava idlis, ensure that you use the right proportion of ingredients, especially the yogurt and baking soda. Also, make sure to rest the batter for a few minutes before steaming to allow the semolina to absorb the moisture.
Related
I hope you love this recipe as much as I do! If you try this recipe, please leave a star rating on the recipe card and leave a comment below to let me know what you think. Subscribe to my newsletter for more easy and delicious recipes!
Recipe

Rava idli
Equipment
Ingredients
- 1 tablespoon ghee (plus more for greasing)
- ½ teaspoon mustard seeds
- ½ teaspoon cumin seeds
- 1 teaspoon urad dal
- 20 curry leaves torn into small pieces
- 35 cashews (chop 10 and reserve remaining as whole)
- 1 tablespoon ginger finely chopped
- 3 spicy green chilies (Thai green peppers) finely chopped
- ¼ teaspoon red pepper flakes
- ¾ cup red onion finely chopped (OR replace with 6 green onions)
- 1 cup semolina/rava (preferable fine)
- ½ cup yogurt
- ½ cup finely grated carrots
- ½ cup green beans finely chopped
- ¼ cup frozen peas thawed
- ½ cup frozen corn kernels thawed
- ½ cup chopped cilantro leaves
- kosher salt
- 1 cup water
- 2 teaspoons lime juice
- 1 teaspoon baking soda (can be replaced with ENO)
Instructions
- Heat the ghee in a large frying pan on medium heat. When it is hot, add in the mustard seeds and let them pop. After they pop, add in the cumin seeds, curry leaves, urad dal and chopped cashews. Fry this mixture for about 2 minutes or until the cashews and urad dal have browned nicely.
- Now add in the ginger, green chilies and red pepper flakes and stir fry for about a minute before adding in the finely chopped onion/green onion. Cook this mixture for about 3-4 minutes or until the onions have turned translucent.
- Add in the rava(semolina) and roast this mixture on medium heat for about 5 minutes or until the semolina is lightly browned. Turn off the heat and let this mixture cool for about 10 minutes before proceeding.
- Add the cooled mixture into a large bowl. Add in the yogurt and water and mix everything together. Let this mixture sit for about 10 minutes.
- After 10 minutes, add in the grated carrots, chopped green beans, peas, corn, cilantro leaves and salt and mix well to combine.
- In the meanwhile, preheat your stove top/microwave idli steamer with water and have it steaming and ready for the next step.
- Grease the idli molds with ghee and place a cashew in the middle of each mold. Now, add in the lime juice and baking soda/ENO into the batter and mix well to combine.
- Pour a little less than ¼ cup of batter into each mold and and place into the hot steamer. Steam this mixture on high for 12 minutes if using a stove top steamer/instant pot or 5 minutes if using a microwave steamer.
- After the idlis have been steamed, use a spoon to scoop them out of the molds and invert them onto a platter to unveil the beautiful domed shape and the cashew in the middle. Let them cool slightly before serving.
Notes
- You could either use greased heat proof ramekins or small bowls to steam the batter in.
- You could also steam all the batter at once in a large heat proof container. It will take longer for the batter to be fully cooked if you choose this method. You could then cut it into cubes and serve it with the chutney.
Estimated Nutrition
Food safety
- Don't leave food sitting out at room temperature for extended periods
- Never leave cooking food unattended
- Use oils with high smoking point to avoid harmful compounds. My favorite oil for all high heat cooking is avocado oil.
- Always have good ventilation when using a gas stove
See more guidelines at USDA.gov.






Tina P says
Hi Viola! It was nice to see one of my favorites on your blog! I was yearning to have some Idlis here in Toronto and to my luck, found some Rava stored at the very back of my cabinet! Followed your recipe to the T and thanks to your clear instructions, came out really delicious ! I had some raw peanuts at home too so maybe the universe made it happen lol. Thanks for these lovely recipes Viola, super combo of Idlis & peanut chutney 🙂